You can skip the photos and see the 2 minute youtube video. I used a camera on a tri pod, set to take photos each 5 minutes (I think). Here is there video:
Original design, pre permit. In the end, we dropped a footing since we only have 3 support columns, there was a double ledger, and I had to add blocking underneath each column so the 4x4's had a minimum 3" bearing surface. Mostly everything else was completed as per the 3D drawing below. I also made some fancy CAD plans and such. The permit department was quite happy with the level of detail.

Now for some photos.
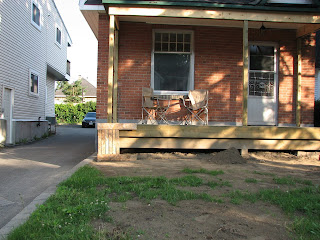
1. The before

2. Building the beam to support the roof. I started with 4x6, but when raising the roof it had waaay too much flex, so we settled on a 6x6 beam which was much better.

3. Beam up, ready to finish the demolition

4. Demo done. We learned that the original beams were set in pockets in the wall. Bigger yet, we learned that the roof isn't tied into the structure at the house, it was a piece of lumber sitting on the brick veneer. Ouch. Also, the original posts were hollow pine boxes but I learned later that this style of columns was quite common in the past.

5. Here we are filling in holes in the foundation. The original beams were set right into the wall, but we were not re-using the beam pockets.

6. Around now, we got a little worried about wind, vibration, etc knocking over the shoring jack. It's more supported on the vulnerable side.

6. Excavation to 6 feet below grade for footings. I think code was 5.5, but people in know recommended. With a backhoe on-site is was quite easy.

7. Remember that the roof was only supported on the brick veneer? We added some small footings to 6 feet against the foundation and tied the concrete to the foundation with large lag bolts / lead shields. Finally, added columns against the wall. This wasn't part of my original design, so I called the inspector and said "this is what I'm doing, unless you have an issue, I'm proceeding this afternoon". I didn't get any call back. In the photo, the square form is for rear posts, the sono tube is for the front column.

8. We hired a concrete truck, very nice not to mix that by hand.

9. Here you can see the sono tubes cut off to the final elevation I wanted.

10. I used a double 2x12 ledger board, attached using 12" galvanized threaded rods. We drilled the bolt pattern through the two 2x12's, then using one of the boards, tacked it to the foundation with tapcons, and advanced the holes further into the concrete. We cleaned out the holes using a compressor epoxied the bolts in and wow, they were strong. What was nice about this approach was that we built the frame, then just lifted it onto the wall. Frame below.

11. The main beam was built (4x12 beam), then the frame lifted on.

12. Here is the rear of the frame, supported on the post and the foundation via bolts. For those wondering, I needed the additional concrete footing and post against the wall b/c of code. Because the roof was only supported on the bricks, and I needed a post, I poured that additional footsing. The City permit department and inspectors don't approve columns without a concrete footing beneath. We added joist hangers, ties, etc once the frame was on the wall. There were also 3" PT deck screws for each joist to rim joist connection.

13. Starting the deck. 3/4" PT Plywood. 4x4 posts are up at the front of the porch.

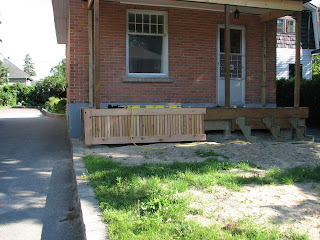
14. This was a small test to start seeing how the skirting would come together.
15. Pouring a small concrete landing for steps.

16. We used tongue and groove pine. To hopefully help them last longer, they were pre-treated with a water proof stain.

17. It's really starting to come together. The skirting was all hand made. It took weeks. Really, construction was 1 week total, the finishing took the time. For the skirting, I cut cedar fence boards, rounded all vertical edges with a router, then started constructing.
18. Closer and closer to being done. You can see the back posts added now.

19. The railings are half done as well. The pickets are 1x1 cedar. Pocket screwed fasten the top railing to the posts so you can't see any screws on the top railing. The top railing is also cedar, routed into a nice profile.


14. This was a small test to start seeing how the skirting would come together.

15. Pouring a small concrete landing for steps.

16. We used tongue and groove pine. To hopefully help them last longer, they were pre-treated with a water proof stain.

17. It's really starting to come together. The skirting was all hand made. It took weeks. Really, construction was 1 week total, the finishing took the time. For the skirting, I cut cedar fence boards, rounded all vertical edges with a router, then started constructing.

18. Closer and closer to being done. You can see the back posts added now.

19. The railings are half done as well. The pickets are 1x1 cedar. Pocket screwed fasten the top railing to the posts so you can't see any screws on the top railing. The top railing is also cedar, routed into a nice profile.

20. The afters!

21. The 4x4 columns where boxed with cedar to make them look more substantial. I used cedar fence boards, and mitered the long edges at 45 degrees to get a nice box around the column. You can see on the right a set of black hinges in the skirting. I made a small storage area for the garden hose, sand/salt in the winter, sprinkler, etc. Cedar boxes are the columns were held together with PL Premium and finishing nails. Actually, PL Premium and nails were also used for the skirting.

No comments:
Post a Comment